Friday, 29 April 2011

Display Properties Tab Missing -How to Solve?

When   you are trying to change the “Display Properties"  on Desktop  sometimes you can view only "Themes" or few “tabs”.  The other tabs  like  "Desktop", "Screen saver", "appearance" and "Settings are may   missing.  What could be the problem?The most likely cause of this is malware utilizing Group Policy Objects which enforces policies for system settings and/or user account(s) settings.
3-12-2010 11-13-42
First you have to ensure  there is no malware in your PC.Now  you have to manually do the registry value change   or by running registry fix from Kellys-Korner.Before making any changes to the Windows XP Registry, please backup your Windows XP Registry
Start> Run> type  “Regedit“ without quotes and navigate these two locations:

HKEY_CURRENT_USER\Software\Microsoft\Windows\CurrentVersion\Policies\System
HKEY_LOCAL_MACHINE\Software\Microsoft\Windows\CurrentVersion\Policies\System

In the right-pane, delete the following values if found:
- NoDispAppearancePage
- NoThemesTab
- NoDispBackgroundPage
- NoDispScrSavPage
- NoDispSettingsPage
3-12-2010 11-22-16
3-12-2010 11-23-01
If none of the above Policies are set (in both of the locations above), ,Still  the display properties tabs are still missing except for the Themes tab, try  these commands from Start, Run dialog:
regsvr32 themeui
regsvr32 /i shell32
Restart Windows
Visit Kellys-Korner and apply the  Registry Patch(line 285)
http://www.kellys-korner-xp.com/regs_edits/restorealldisplaytabs.reg
Also check : http://support.microsoft.com/kb/922370/en-us
You may also want to perform an XP System Restore by going to Start > All Programs > Accessories > System Tools > System Restore. There you can select a date prior to when the issue began. This can also be done in Safe Mode .

How to Remove the Windows 7 Security Flag.

One of the   annoying “features” of Windows 7, is the  white flag that pops up to inform you that  how to solve a specific problem by Windows. Action Center alerts you when potential computer problems exist such as the virus protection being out of date, a backup needing to occur, or if your computer needs to be restarted etc.
8-4-2010 8-19-43 AM
For various reasons you may not  want to see  such  warning messages.You can configure your  Windows 7 to disable such  security flag notifications
  • Right click on the Windows 7 Security flag icon.
  • Click on “Open Action Center”.
  • Now click on “Change Action Center settings” on the left side of the screen.
8-4-2010 8-48-18 AM
  • Uncheck “User Account Control”, then click on OK
8-4-2010 8-54-17 AM


How to Check the Integrity of the Windows 7 System Files

Windows  includes a  utility that  scans your  Windows 7 system for corrupt, changed  or missing  system files. Normally  you run  this utility in booting  off the DVD into repair mode but running this from the command prompt is much easier.To run this utility , you will need to open a command prompt in administrator mode and follow the  steps.9-1-2010 6-52-55 AM
  1. Go to Start menu.
  2. Select All Programs and then Accessories
  3. Right-click on Command Prompt and select Run As Administrator.You can run the service in Command Prompt, by using the following syntax: SFC [/SCANNOW] [/VERIFYONLY] [/SCANFILE=] [/VERIFYFILE=] [/OFFWINDIR= /OFFBOOTDIR=]
  4. Press Enter
9-1-2010 7-08-16 AM
This  will scan and attempt to repair any files that are changed or corrupted. You can run that command with sfc /scannow.

Google Accounts Get 2-Step Verification Security

Google has recently announced an advanced sign-in security feature for Google Accounts called 2-step verification.It adds an extra layer of security to your Google Account by requiring you to have access to your phone – as well as your username and password – when you sign in. This means that if someone steals or guesses your password, the potential hijacker still can't sign in to your account because they don't have your phone.This feature is now available for all Google Accounts.
To enable validation  visit  your account settings page.Here you can  find an option for setting up the 2-step verification for your account.
3-1-2011 6-29-24 AM
In the next page  there will be a brief instruction and click the “set up2 step verification”
3-1-2011 6-30-15 AM
Now  you  have to select the type of phone you are carrying, 4 options are there –Android,BlackBerry,iPhone and others option.
3-1-2011 6-30-45 AM
Enter your phone number  and then click the ‘Send Code’ on the next page.Here you can choose the SMS option or he Automated voice message option.The ‘code’ will receive within seconds on your mobile.
3-1-2011 6-36-15 AM
Enter that  code to verify  and click  next to proceed.
3-1-2011 6-39-55 AM
In the next page  you have to generate the back-up of the given  mobile phone support with the help of any other mobile or landline phone.But here verification is not mandatory.Backup verification codes  will help you to login to your account when both the phones do not work.Each of the codes  can be used to access your account for one time.

3-1-2011 6-43-26 AM
After the backup next page will be to confirm the 2 step verification.You can see some suggestions   are  mentioned here ,just go through it and press next.
3-1-2011 6-48-19 AM
You can now Turn on 2-step verification in the next page to complete the setup.
3-1-2011 6-50-00 AM

3-1-2011 6-58-10 AM

Each time you sign in from an unverified computer, you will be required to  verify your identity with both a password and a verification code, which you can  get via a mobile app, SMS text message, or phone call.When you are using the same computer and the same browser for which you can  select “Remember verification for this computer for 30 days”  .
This  extra step significantly improves the security of Google Account because it requires the powerful combination of both your username & password and your phone.

Troubleshooting – 28 Common Errors in your Computer-part 3

21.    HARD DISK MAKING NOISE WHILE PROCESSING – Unstabilized power supply. Check for loose contact. Do not use Y connectors for hard disk. It may create bad sector or weak hard disk.
        solution-------------> only solution for change your hard disk and get your data quickly

22.    HARD DISK HANGS WHILE PROCESSING – Check for bad sector by using CHKDSK or SCANDISK Command. If found, format the hard disk and set Partition before that area. This is the only procedure to use hard disk with bad sector or avoid bad sectors using Standard Power Supply.
       solution-------------> best solution change your hard disk,next chance use DM (disk management) and remove the bad sectors


23.    HARD DISK NOT DETECTED – Check power connector. Check data cables. Check jumpers.

24.    PARTITION NOT SHOWN – Operating System, where the hard disk is formatted, is not supported with present mother board, e.g. hard disk formatted with Pentium System will hide their partitions for 486 systems.
25.    MMX/DLL FILE MISSING – The above files may be corrupted due to power failure or virus. Make these files available from another computer or re-install Windows 98 Operating System. (This procedure will not affect the existing data).

26.    WINDOWS REGISTRY ERROR – This will happen due to sudden ON/OFF of the system. Final solution is to re-install Operating System.

27.    DISPLAY COLOUR DOES NOT MATCH – Configure Display card properly with their CD. The Standard setting for Windows is set to 800×600 for better performance.

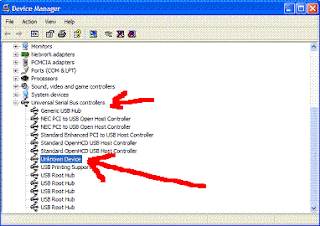
28.    UNKNOWN DEVICE FOUND – The driver utility may not be provided with the operating system. Install software for the above device.
 THANK YOU!!!!!!!

Troubleshooting – 28 Common Errors in your Computer-part 2

11.    SHOWING HDD ERROR OR HARD DISK FAILURE  – Check power cord. Check connection of HDD. Check data cable. Check hard disk parameters in CMOS or Auto Detecting Setting Partitions by Fdisk Command, then format it to set track 0.
 12.    MOTHER BOARD HANGS DUE TO UNSTABILIZED POWER SUPPLY – Check S.M.P.S. RAM not functioning properly. Software problem (due to using pirated software). CPU fan not functioning properly.
i) smps burned or smps voltage proplem
  ii) cpu fan rpm slow , cpu fan dead or cpu fan leg damage:
iii)ram dump error ,blue screen error or ram burned
 13.    DANCING SCREEN – Check display card connection. .Video memory problem,ups near to  monitor solution-------------> displace the ups 2 feet away from monitor
 14.    SHAKING SCREEN – Earthing problem. Magnetic waves,monitor near in speaker or up
            solution-------------> earthing connection in your switch board , displace the ups 2 feet away from monitor  and ups  
 

15.    CPU CABINET SHOCK – Check earthing. Check main power cord.
 16.    NON-SYSTEM DISK ERROR  – Floppy drive having different disk (non-bootable disk) or CMOS parameters for hard disk may not be set properly. Hard disk partitions may not be created. Hard disk may not be formatted.
 17.    MISSING OPERATING SYSTEM – The system files missing namely le;command.com} – User File IO.SYS & MS_DOS.SYS} – Hidden files. These three files are required for Starting up of the system that can be transferred by using SYS C:Command or take the time of formatting by using c:/u/s.
 18.    MISSING COMMAND INTERPRETOR – The file Command.com may be corrupted or infected by a virus or it has been deleted.

19.    SHOW I/O ERROR – The type of hard disk in CMOS may not be set properly. Operating system used for formatting is not valid.
20.    SHOWING DIVIDE OVER-FLOW MESSAGE  – Some directories or files clashing with other files. Use CHKDSK/F or SCANDISK Command to correct it.


Troubleshooting – 28 Common Errors in your Computer-part 1

1.    MONITOR LED IS BLINKING – Check all the connections like monitor cable, data cables, RAM, display card and CPU connections.
 

2.    CONTINUOUS THREE BEEPS – Problem in RAM connection.

 3.    THREE BEEPS (1 LONG, 2 SHORT) – Problem in Display Card Connection
 4.    THREE LONG BEEPS PERIOD WISE – Problem with BIOS or RAM (Basic Input Output System).
5.    CONTINUOUS NON-STOP BEEPING – Key board problem (i.e. some keys are pressed in too long).
6.    FDD LED IS GLOWING CONTINUOUSLY – Data cable is to be connected properly (twisted cable).
7.    NO DISPLAY ON THE SCREEN – Hard disk cable connected incorrectly. Connect correctly, seeing the red mark (faces power supply) and then Restart.
8.    POWER LED IS OFF – Check main power cord. Check S.M.P.S. Check Mother Board connection.


 9.    SHOWING CMOS ERROR – Replace 3 volt battery of Mother Board. Set original settings manually. (Refer CMOS Setup chart). Enter your search term Submit search form.

 10.    SHOWING FDD ERROR OR FLOPPY DRIVE IS NOT WORKING PROPERLY – Check power cord of FDD, data cables, set CMOS and finally check the drive.
                                                                           

Related Posts Plugin for WordPress, Blogger...
Twitter Delicious Facebook Digg Stumbleupon Favorites More

 
Design by Free WordPress Themes | Bloggerized by Lasantha - Premium Blogger Themes | belt buckles